How to Create and Publish a Job Posting in Kinet360
Introduction
A Kinet360 job posting is the first step of your recruitment process. It tells candidates which role is open, and it gives your team one place to manage the hiring that follows.
This guide shows how to create and publish a job posting in Kinet360, one screen at a time. Every step has an annotated screenshot with numbered markers and arrows, so you can see exactly where to click and what to enter.
You do not need any earlier experience with Kinet360. If you can follow a short list of questions, you can post a job.
What Is Kinet360 Job Posting?
Kinet360 Job Posting is the part of Kinet360 recruitment where you create job postings for your career page. It lives inside the Recruitment module, under the Job Postings tab. The page describes itself as the place to create and manage job postings for your career page.
Each posting appears in a list. The list shows the job title, its status (for example Open), the area of work, the location, the employment type, the number of applicants and a date. From the same Recruitment module you can also reach the Dashboard, the Pipeline and the Applications tabs, so a posting connects directly to the rest of your recruitment management.
How Kinet360 Job Posting Works
The job posting process in Kinet360 is a guided conversation. You start it from the Recruitment page, and an assistant called Kin asks one question at a time in the panel on the right side of the screen. You answer each question by selecting an option or typing a reply.
In short, the process looks like this:
1. Open Recruitment and select the Job Postings tab.
2. Start the posting with the Post a Job quick action.
3. Choose the position.
4. Confirm the job title.
5. Choose the employment type.
6. Choose the location type.
7. Enter the salary range.
8. Choose the salary currency.
9. Enter the number of openings.
10. Set the application closing date.
11. Add the key requirements.
12. Find the finished posting in the Job Postings list.
Some questions have a Skip button, so you can leave optional details empty.
Step-by-Step: How to Create a Job Posting in Kinet360
Step 1: Open Recruitment and the Job Postings Tab
What you see: The Kinet360 menu on the left. Under HRM, you will find Recruitment.
What to do:
1. Select Recruitment in the left menu (marker 1).
2. Select the Job Postings tab (marker 2).
Why it matters: This is where all job postings are created and managed.
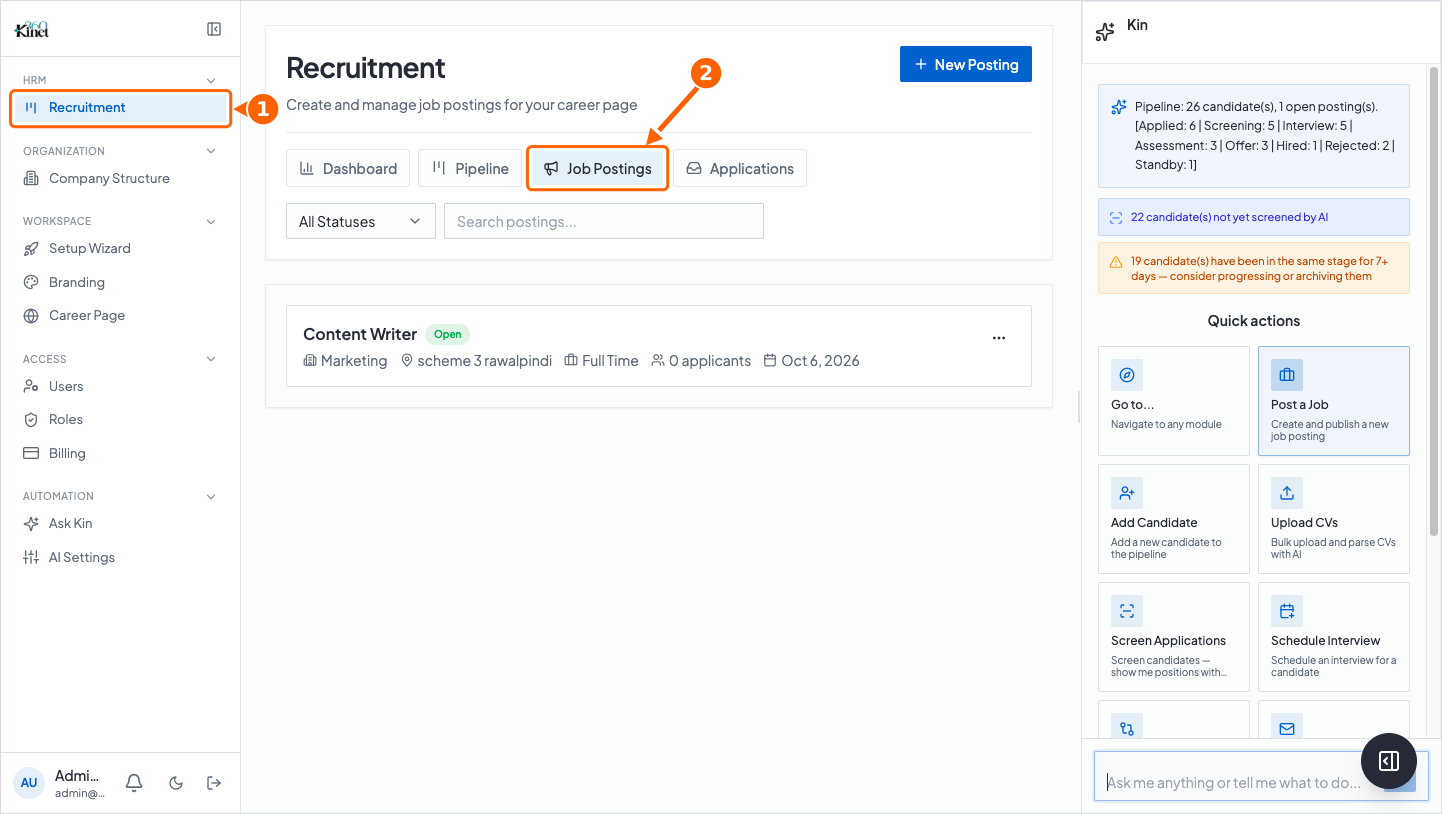 What happens next: The Job Postings tab opens. You see a status filter called All Statuses, a search box for postings, and the list of postings that already exist.
Step 2: Start a New Job Posting
What you see: Two places to start. The blue New Posting button is at the top right of the Recruitment page (marker 2). The Kin panel on the right has a Quick actions area with a Post a Job tile (marker 1). The tile says it will create and publish a new job posting.
What to do: Select Post a Job in the Quick actions area.
Why it matters: This starts the guided questions that build your job posting. This guide follows the Post a Job route because that is the route shown in the screenshots.
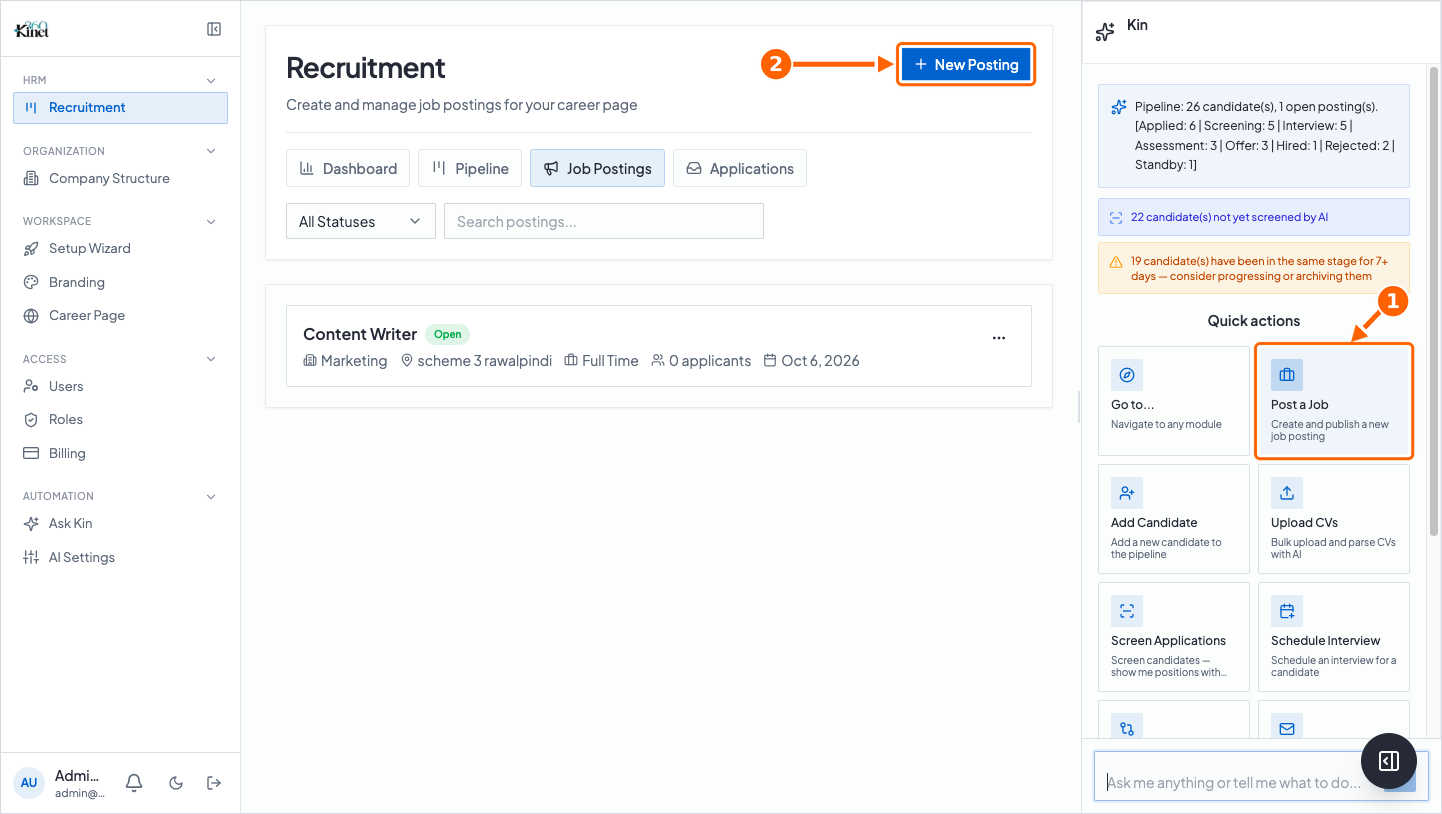 What happens next: Kin begins asking questions, one at a time. The next step shows the first question.
Step 3: Choose the Position
What you see: Kin asks, “Which position is this for?” Below the question is a list of positions: Backend Developer, Content Writer, Data Analyst, DevOps Engineer, Engineering Lead, Finance Officer, Frontend Developer, HR Specialist, Marketing Manager, Office Manager, Product Manager, Project Coordinator, QA Engineer, Recruitment Specialist, Senior Software Engineer, Software Engineer, UI Designer and UX Designer.
What to do:
1. Select the position you are hiring for. In this example, Content Writer is selected (marker 1).
2. If your role is not in the list, type its name in the message box at the bottom of the Kin panel (marker 2). The question says you can type a new role name to create it.
Why it matters: The position tells Kinet360 which role the job posting belongs to.
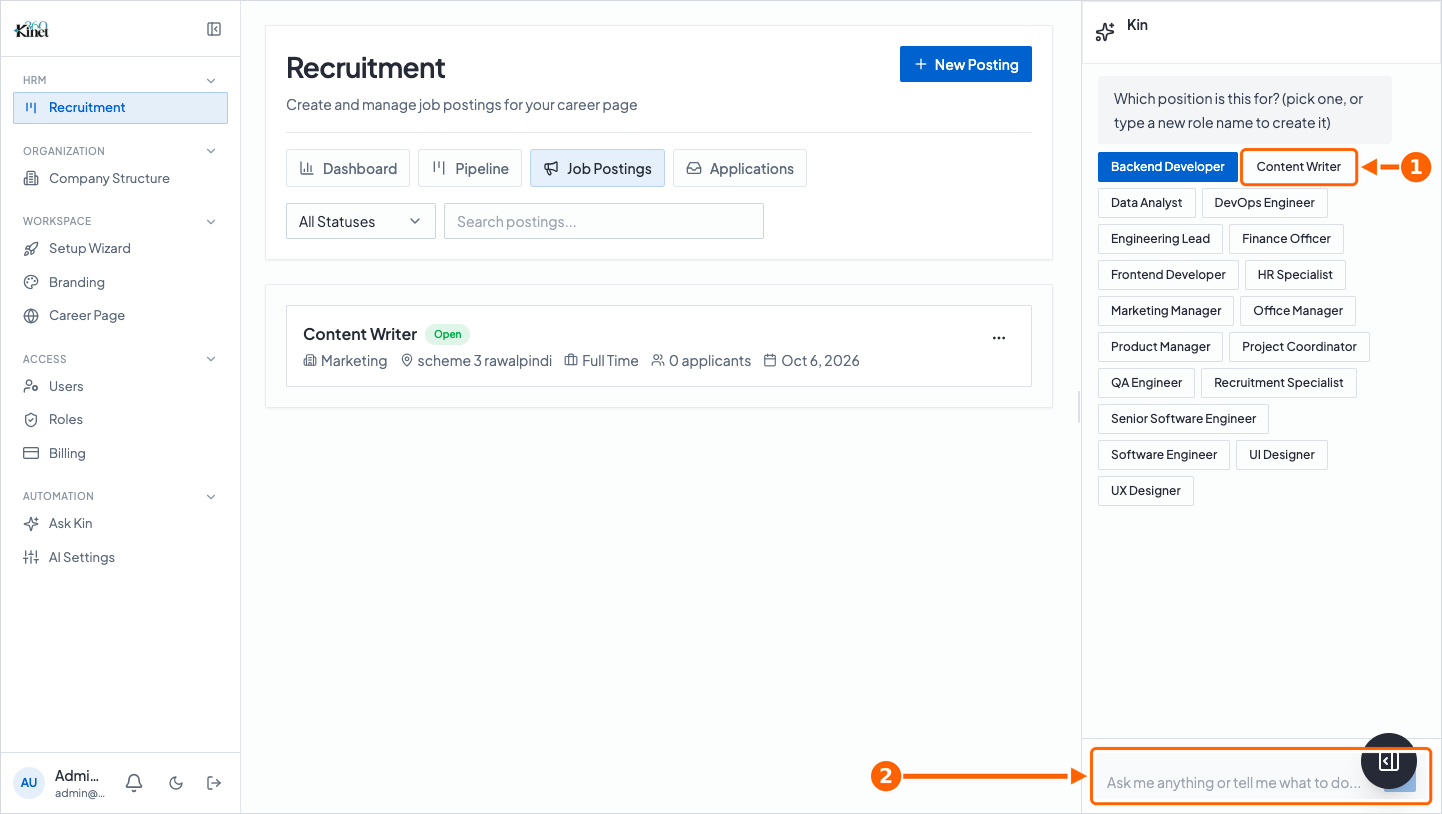
What happens next: Your choice appears as your reply, and Kin moves to the next question.
Step 4: Confirm the Job Title
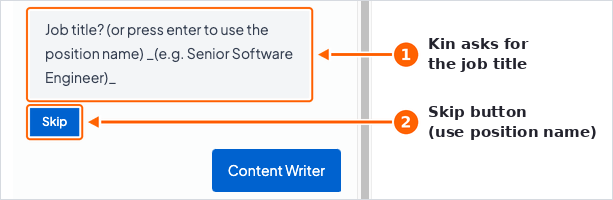
What you see: Kin asks for the job title and gives an example, Senior Software Engineer (marker 1). A Skip button is shown under the question (marker 2).
What to do: Type the title that candidates should see, or select Skip to use the position name. In this example, the title is Content Writer, the same as the position.
Why it matters: The job title is the name that appears on the posting, so write it the way candidates search for it.
What happens next: Kin saves the title and asks about the employment type.
Step 5: Choose the Employment Type
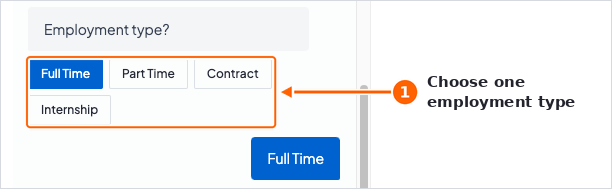
What you see: Kin asks, “Employment type?” Four options are shown: Full Time, Part Time, Contract and Internship.
What to do: Select one option (marker 1). In this example, Full Time is selected.
Why it matters: The employment type is shown with the posting, so candidates know what kind of role it is before they apply.
What happens next: Your choice appears as your reply, and Kin asks about the location.
Step 6: Choose the Location Type
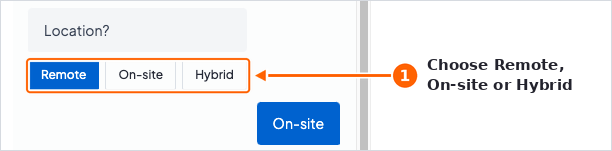
What you see: Kin asks, “Location?” Three options are shown: Remote, On-site and Hybrid.
What to do: Select the option that matches how the person will work (marker 1). In this example, On-site is selected.
Why it matters: Candidates use this detail to decide whether the role suits them.
What happens next: Kin shows your answer and asks for the salary range.
Step 7: Enter the Salary Range
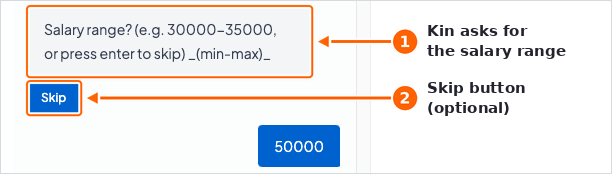
What you see: Kin asks, “Salary range?” The question shows an example and says the format is minimum and maximum (marker 1). It also says you can press Enter to skip, and a Skip button is shown (marker 2).
What to do: Type the range in the message box at the bottom of the Kin panel and press Enter. If you do not want to share a salary, select Skip
Why it matters: A clear salary range helps candidates decide whether to apply. The question is optional.
What happens next: Kin shows your answer and asks for the salary currency.
Step 8: Choose the Salary Currency
What you see: Kin asks, “Salary currency?” The options include PKR, USD, EUR, GBP, AED, INR and SAR.
What to do: Select the currency for the salary range you entered (marker 1). In this example, USD is selected.
Why it matters: The currency makes the salary range clear. Choose the same currency that you used when you typed the range.
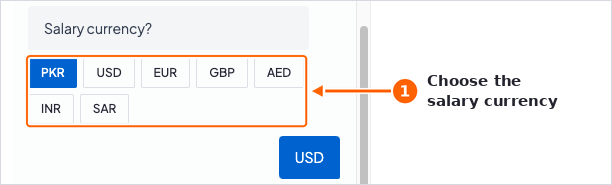
What happens next: Kin shows your choice and asks how many openings there are.
Step 9: Enter the Number of Openings
What you see: Kin asks, “How many openings?” The question says you can press Enter for 1 (marker 1), and a Skip button is shown (marker 2).
What to do: Type the number of people you plan to hire, or select Skip to keep the default of 1. In this example, the answer is 1.
Why it matters: The number of openings shows how many people you plan to hire for this role.
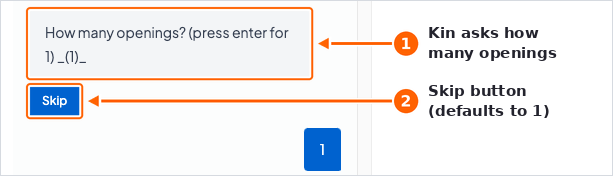
What happens next: Kin shows your answer and asks for the application closing date.
Step 10: Set the Application Closing Date
What you see: Kin asks, “Application closing date?” A date field and a Set date button are shown together (marker 1). A Skip button is shown below them (marker 2).
What to do:
1. Select the date field and pick a date.
2. Select Set date.
3. If the posting has no closing date, select Skip instead.
In this example, the closing date is 10 Oct 2026.
Why it matters: The closing date tells candidates how long they have to apply.
 What happens next: Kin shows the date as your reply and asks for the key requirements.
Step 11: Add the Key Requirements
What you see: Kin asks for the key requirements of the role. It explains that you can pick suggested requirements that apply, add your own, or skip. It also says these requirements become the job description highlights and the screening criteria. In this example, no suggestions are available, so a box asks you to type the key requirements, separated by commas.
What to do:
1. Type the key requirements in the text box (marker 1). Separate each requirement with a comma.
2. Select Use these requirements (marker 2).
Why it matters: Clear requirements help candidates understand the role. They also give your team a consistent list of what to look for.
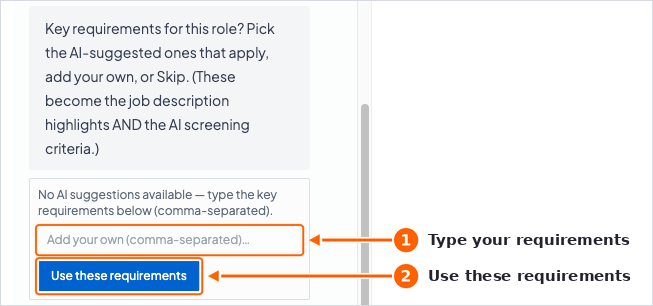
What happens next: Kin has now asked every question in the posting flow. Kin uses your answers to complete the job posting.
Step 12: Find the Job Posting in the List
What you see: The Job Postings tab, with your postings listed under the All Statuses filter and the search box.
What to do: Open Recruitment, then Job Postings, and look for your posting in the list (marker 1).
Each posting card shows the job title, a status label, the area of work, the location, the employment type, the number of applicants and a date. In the example, the Content Writer posting shows the status Open, the type Full Time and 0 applicants.
Why it matters: This list is your starting point for managing the posting after it is created. Use the All Statuses filter or the search box to find a posting quickly.
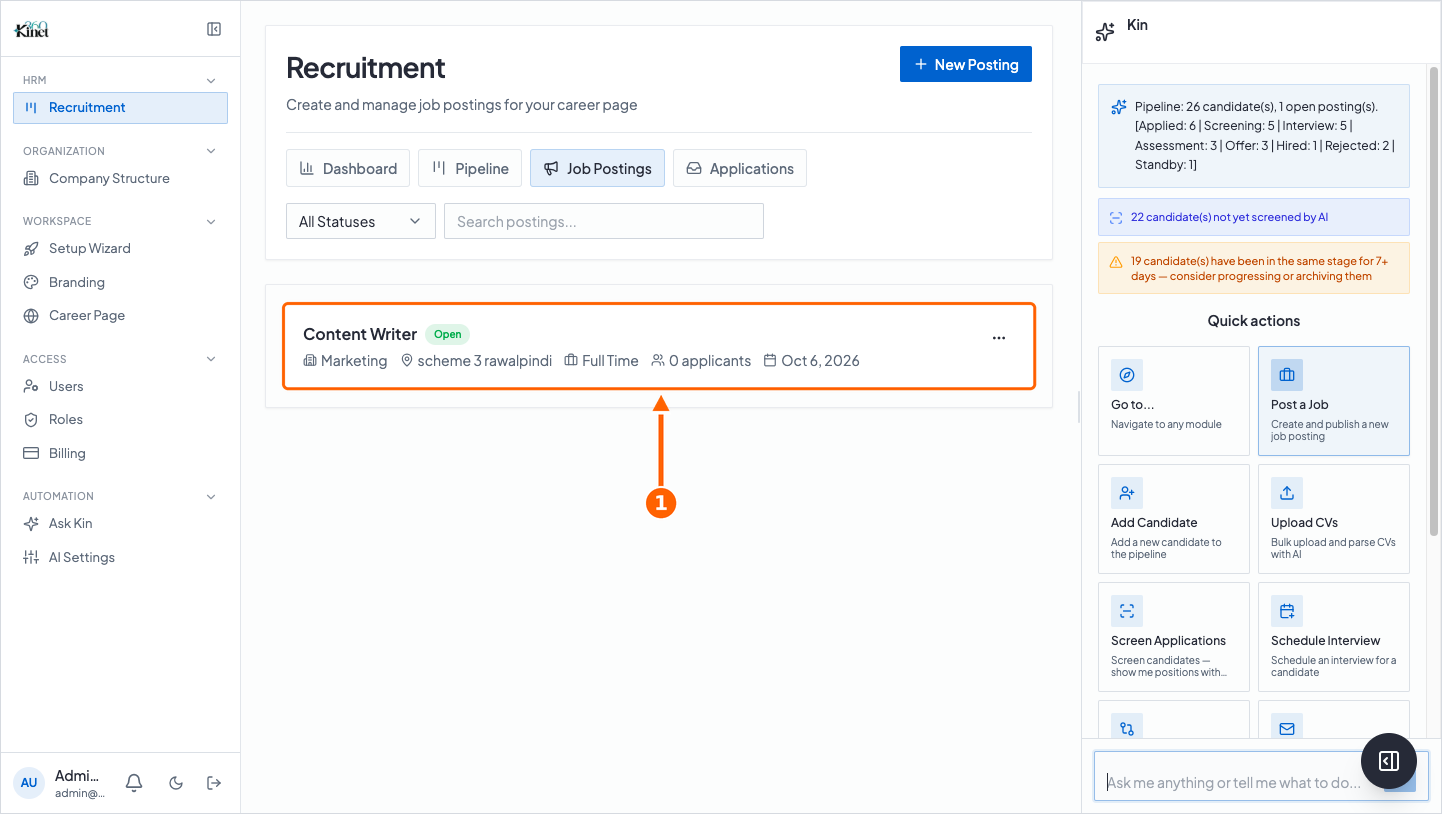
What happens next: As candidates apply, the applicant count on the posting changes, and the candidates can be followed in the Pipeline and Applications tabs of the Recruitment module.
Conclusion
The Kinet360 job posting process is a short list of questions. You open Recruitment, start Post a Job, and answer each question from Kin: position, job title, employment type, location, salary, currency, openings, closing date and key requirements. When you finish, the posting appears in the Job Postings list.
Because the posting lives inside the Recruitment module, it connects to the rest of your recruitment management. The same module holds the Dashboard, the Pipeline and the Applications tabs, so you can follow candidates from the moment they apply.